Share
Pin
Tweet
Send
Share
Send
And so, we need:
-Case (you can buy ready-made, but how can I take it from a computer power supply)
- A transformer with an output voltage of up to 30V and a current of up to 1.5 amperes (I took a more powerful trans as 1.5A is not enough for me)
-Simple set of radio components:
-Diode bridge on 3A.
- Electrolytic capacitor 50V 2200uF.
Ceramic capacitor at 0.1 microfarads (to smooth out the ripple more).
- Microcircuit LM317 (in my case 2 such microcircuits).
-Resistor variable 4.7kOhm.
- Resistor at 200th 0.5W.
Ceramic capacitor at 1uF.
-Old analog tester (I used as a voltmeter).
- Textolite and iron chlorine (for etching the board).
-Terminals.
-Wire.
-Soldering supplies.
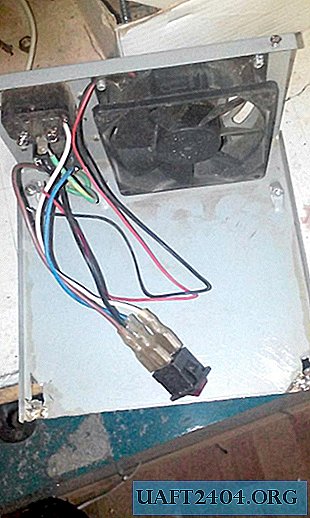
Getting started! I took the case from the computer Power Supply. We disassemble it and pull out the insides and saw off the front panel (the one with which the wires come out) as in the photo.
Next, we collect it back and cut out the front panel of the future power supply from the fiberboard, it will be more beautiful from plastic.

We cut off the board mounting on one side and bend them in such a way as to fix the front panel made by us on them.


We select a place for the transformer, drill holes in the lower part of the housing and fix the transformer.

Now we begin to collect the board to start it needs to be etched. We transfer the pre-printed circuit board to the textolite.

And we throw in bleach for 10-20min. After etching, drill holes and tack on the board.


Solder the elements according to the scheme.


We take the wires, assemble the circuit and pack everything in the case. IMPORTANT! (the microcircuit needs to be installed on the heatsink since under heavy loads it gets very hot and can fail). Here's what happened.

Now you need to get the voltmeter from the old tester. To do this, simply cut off the indicator itself from the plastic case.

Next, you need to put a jumper on the tester board in the 50V range, cut a hole in the front panel under our voltmeter and connect the wires. We isolate our board and close the case. I installed a cooler on top to blow the radiator on which the microcircuit is installed.


That's all! Laboratory power supply is ready! Good luck to all!
Share
Pin
Tweet
Send
Share
Send