Share
Pin
Tweet
Send
Share
Send
![](http://img.uaft2404.org/img/sdela-2019/vosstanovlenie-naproch-zarzhavevshego-kuhonnogo-tesaka.jpg)
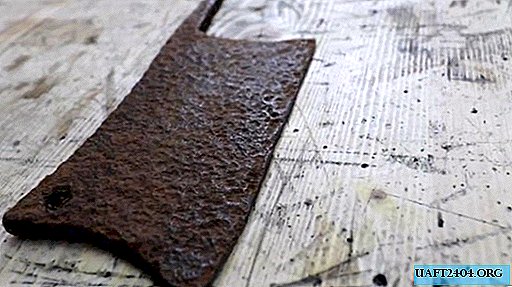
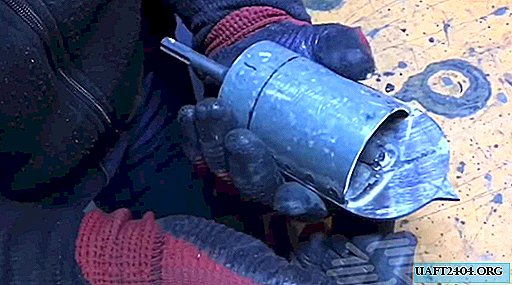
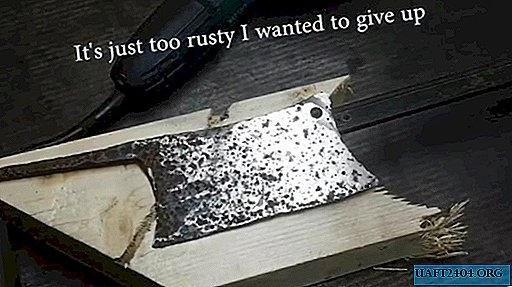
I am sure that many of you in your life have found antique knives, forks, dishes, etc. So I, sorting the rubble in the old barn, I found a kitchen cleaver, or rather its blade, since the handle has long decayed. He was in a terrible and almost unusable condition. Anyone else in my place would just throw it in the trash and that’s it. But I decided to give him a second life.
![](http://img.uaft2404.org/img/sdela-2019/vosstanovlenie-naproch-zarzhavevshego-kuhonnogo-tesaka-2.jpg)
As you can see, the entire canvas of the cleaver is so badly rusted that sinks in unprepared places have a depth of almost 2 mm. And in general it is not known what thickness of the knife was originally.
Restoring a rusty meat knife
Clamp the knife with a clamp on a piece of wood to the table.
![](http://img.uaft2404.org/img/sdela-2019/vosstanovlenie-naproch-zarzhavevshego-kuhonnogo-tesaka-3.jpg)
And we begin to process angle grinders. Grind one side first.
![](http://img.uaft2404.org/img/sdela-2019/vosstanovlenie-naproch-zarzhavevshego-kuhonnogo-tesaka-4.jpg)
![](http://img.uaft2404.org/img/sdela-2019/vosstanovlenie-naproch-zarzhavevshego-kuhonnogo-tesaka-5.jpg)
Next, we finish on a belt grinding machine.
![](http://img.uaft2404.org/img/sdela-2019/vosstanovlenie-naproch-zarzhavevshego-kuhonnogo-tesaka-6.jpg)
To keep the blade free from nicks, grind off the cutting edge.
![](http://img.uaft2404.org/img/sdela-2019/vosstanovlenie-naproch-zarzhavevshego-kuhonnogo-tesaka-7.jpg)
After a long rough processing, the cleaver looks like this.
![](http://img.uaft2404.org/img/sdela-2019/vosstanovlenie-naproch-zarzhavevshego-kuhonnogo-tesaka-8.jpg)
Then we grind with a circle with the finest grit.
![](http://img.uaft2404.org/img/sdela-2019/vosstanovlenie-naproch-zarzhavevshego-kuhonnogo-tesaka-9.jpg)
We process the hole by passing a drill, drilling all the rust.
![](http://img.uaft2404.org/img/sdela-2019/vosstanovlenie-naproch-zarzhavevshego-kuhonnogo-tesaka-10.jpg)
Slicer ready for polishing.
![](http://img.uaft2404.org/img/sdela-2019/vosstanovlenie-naproch-zarzhavevshego-kuhonnogo-tesaka-11.jpg)
Apply polishing paste.
![](http://img.uaft2404.org/img/sdela-2019/vosstanovlenie-naproch-zarzhavevshego-kuhonnogo-tesaka-12.jpg)
And polish with a soft circle to shine.
![](http://img.uaft2404.org/img/sdela-2019/vosstanovlenie-naproch-zarzhavevshego-kuhonnogo-tesaka-13.jpg)
Shines like new.
![](http://img.uaft2404.org/img/sdela-2019/vosstanovlenie-naproch-zarzhavevshego-kuhonnogo-tesaka-14.jpg)
Pen making
Now you need to make a knife handle. To do this, take a dense tree and draw a contour of a future pen on it with a pencil.
![](http://img.uaft2404.org/img/sdela-2019/vosstanovlenie-naproch-zarzhavevshego-kuhonnogo-tesaka-15.jpg)
We cut along the contour.
![](http://img.uaft2404.org/img/sdela-2019/vosstanovlenie-naproch-zarzhavevshego-kuhonnogo-tesaka-16.jpg)
Cut in half.
![](http://img.uaft2404.org/img/sdela-2019/vosstanovlenie-naproch-zarzhavevshego-kuhonnogo-tesaka-17.jpg)
We make a chisel for the groove under the blade handle.
![](http://img.uaft2404.org/img/sdela-2019/vosstanovlenie-naproch-zarzhavevshego-kuhonnogo-tesaka-18.jpg)
We breed epoxy resin. We generously coat the groove and put the handle of the blade into the recess.
![](http://img.uaft2404.org/img/sdela-2019/vosstanovlenie-naproch-zarzhavevshego-kuhonnogo-tesaka-19.jpg)
Glue the second half of the wooden handle on top and clamp it with a clamp.
![](http://img.uaft2404.org/img/sdela-2019/vosstanovlenie-naproch-zarzhavevshego-kuhonnogo-tesaka-20.jpg)
After drying and hardening of the epoxy resin, we clamp the cleaver in a vice through a piece of wood so as not to leave marks on the blade.
We process the handle, giving it the desired shape.
![](http://img.uaft2404.org/img/sdela-2019/vosstanovlenie-naproch-zarzhavevshego-kuhonnogo-tesaka-21.jpg)
At the end we grind to smoothness.
![](http://img.uaft2404.org/img/sdela-2019/vosstanovlenie-naproch-zarzhavevshego-kuhonnogo-tesaka-22.jpg)
Then we impregnate the tree with drying oil.
![](http://img.uaft2404.org/img/sdela-2019/vosstanovlenie-naproch-zarzhavevshego-kuhonnogo-tesaka-23.jpg)
The last stage is sharpening the cutting edge to a sharp razor. All this is done on a stone with minimal crumb moistened with water.
![](http://img.uaft2404.org/img/sdela-2019/vosstanovlenie-naproch-zarzhavevshego-kuhonnogo-tesaka-24.jpg)
Reconstructed Cleaver
Cuts paper like a razor. Exactly what is needed!
![](http://img.uaft2404.org/img/sdela-2019/vosstanovlenie-naproch-zarzhavevshego-kuhonnogo-tesaka-25.jpg)
Cleaver restored.
![](http://img.uaft2404.org/img/sdela-2019/vosstanovlenie-naproch-zarzhavevshego-kuhonnogo-tesaka-26.jpg)
As you can see, unprocessed sinks - traces of corrosion - are perfectly visible on a shiny canvas. To remove them, you need to grind the knife significantly. I did not do this and removed the optimal layer from the blade. I think this will not affect the quality of cutting.
![](http://img.uaft2404.org/img/sdela-2019/vosstanovlenie-naproch-zarzhavevshego-kuhonnogo-tesaka-27.jpg)
The cleaver turned out to be very good steel - it has not been dull for quite some time.
I generally like antiques. Bye everyone!
Watch the detailed video
Share
Pin
Tweet
Send
Share
Send