Share
Pin
Tweet
Send
Share
Send
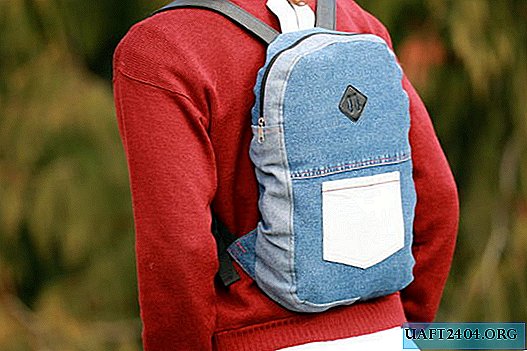

Perhaps you have a couple of old unnecessary jeans lying around? Try stitching a bright and cute backpack out of denim that will cost you virtually nothing.
This is a great way to give new life to old things that would otherwise go to the trash. And if you don’t have your own old jeans, you can buy them cheaply in second-hand clothes.
Follow the instructions and you will get a great backpack that will accompany you on any journey.
Instruments


To work you will need:
- Scissors.
- Marker.
- Pins
- Threads in a contrasting color.
- Matches or lighter.
- Ruler.
- Cutting board.
- Ripper
- Foot for zippers on a sewing machine (if you don’t have one, you can use the usual one).
- Sewing machine.
- Scissors for metal (not necessary, but may come in handy).
- Iron.
Take on the following tricks:
- Iron your backpack periodically. Then at the end of the work he will look much better.
- Fold the piece in half to find the middle of the fabric. Mark the middle with pins.
- The size of the details in the instructions are for a small backpack for every day. If you want a larger bag, adjust the size.
- Use the special device for opening seams if you need to dissolve some seam.
Pick up materials


1. The fabric is approximately one square meter. Any thick fabric is suitable: jeans, velveteen, tarpaulin, etc. You can use old denim skirts. If you use ripped jeans, you may have to sew several pieces to get the right size for the part.
2. Two plastic length adjusters for belts and straps of 28 cm of appropriate width.
3. A small square of fabric in a contrasting color to make a pocket on the front of the backpack (you can use leather from an old leather product)
4. Lightning 42 cm long.
5. Two straps of 47.5 cm.
Cut the front and back parts

Cut two identical 37.5 x 25 cm rectangles. Lay them on top of each other and fold them in half along. Using scissors, make the corners slightly rounded, the lower ones slightly smaller than the upper ones. Then the shape of the details will be more like a backpack.
Sew on the front pocket


Cut a 17 x 17 cm square out of contrast fabric. You can experiment with color and texture, the main thing is that the fabric is durable.
Twist the top edge of the square twice and sew it with a straight seam to fasten. You can make another seam along the top line with a contrasting thread for beauty.
To give the piece of fabric a pocket shape, fold the square in half vertically and cut a piece of fabric at a slight angle from the fold to the edge.
Wrap all edges except the top by about 0.5 cm and pin with pins in the center of the front of the backpack.
Sew a pocket along the edges with two rows of seams with contrasting thread.
Cut and sew side parts

Cut three strips of denim fabric measuring 42 by 9 cm.
Fold the two strips facing the wrong side and sew together on the short side.
Spread the stitched strips of fabric and stitch the fabric allowance so that it does not fray inside.
Insert zipper


Take the third strip, fold it in half to determine the middle and cut along the fold line.
Set the zipper foot on the sewing machine. Or set the needle in a lateral position so that it does not get into the zipper itself when you start sewing! (It is not necessary to have a special zipper foot; you can perform this step without it).
Pin one half of the jeans strip face down with the pins to the right side of the zipper and sew them as close to the zipper cloves as possible.
Sew the second strip to the other side of the zipper, but not the front but the wrong side down so that the two halves contrast with each other.
Fold the fabric over the cloves on both sides of the zipper and stitch it to the wrong side.
Sew the sides


Fold the strip with zipper and double strip with the front sides and sew on the short side on both sides to make a closed part.
Stitch up the allowances.
Sew side strips to the front part.


Fold the front part and the zip strip with the front sides together. The middle of the zipper should coincide with the middle of the front of the backpack. Fasten everything with pins, straightening the fabric on the bends.
Gently stitch the details. Stitch the allowances using a black thread (or choose another color that suits you).
Make a loop for the handle


Cut two 10.5 x 7 cm rectangles from the same fabric that you used for the front pocket and sew them together on the short side.
Now straighten the seam, fold the fabric in half along the inside out and sew together.
You should get a long tube of fabric.
Fasten a safety pin to one end of the tube and carefully twist it with its face out.
Bend both ends, aligning them in the middle with the sides, and iron everything as shown.
Sew the handle to the top of the front of the back.
Sew on belts


Cut a 11 x 11 cm square from denim.
Using a ruler, draw a line from one corner to the opposite and cut a square along it.
Lay one of the straps 28 cm long at right angles to the long side of the triangle and fold it in half around the strap, as shown in the photo. Leave a small piece of webbing sticking out of the triangle and stitch the fabric to the webbing.
Turn the triangle and webbing face out and stitch the corner. For greater strength, make a square seam through the fabric and the tip of the strap that you left sticking out of the triangle.
Do the same with the other strap and triangle, but use the fabric with the wrong side facing out.
Place the triangles at the same height from the bottom edge of the back of the backpack and sew them on.
Attach belt adjusters


Cut two more pieces of straps 8 cm long and burn the edges with a match or lighter so that they do not fray.
Pass a piece of the strap through the regulator and back, sew up the end. The regulator should be attached to the end of the strap in a small loop.
Attach the short strap to one end of the long (47.5 cm) strap as shown in the photo.
To understand how all this will look together in the end, look at the first photo.
(If you don’t have ready-made straps and want to make them from scratch, cut two strips of 47.5 by 4 cm fabric and sew them into long tubes, and then turn them face-out, as is the case with the handle).
Make an internal key pocket


Cut a 24.5 by 9.5 cm rectangle from denim.
Wrap one of the short ends twice and sew.
Fold the rectangle face in. Sew on the sides.
Turn the pocket facing out and make two small cuts on each side so that the seams that are inside lie flat.
Wrap the small shreds that came out when you made the cuts and sew a pocket in a circle with contrasting thread.
Minor improvements before final assembly


Lay the straps face up on the back of the backpack on both sides of the top handle and sew them on.
Attach the inside pocket with the front side to the inside of the middle part with zipper. Check the second photo and sew them.
The third photo shows how it should look when the backpack is completely ready. The key pocket should be located near the top edge of the back.
Sew the details of the backpack together


Find the middle of the upper and lower edges of the back and strap with zipper. First align them and fasten them with pins.
Continue to flatten the fabric and hold the back and side part all the way around.
Gently stitch the parts in a circle.
Turn the bag face out and make sure that everything suits you. If everything looks good, make a zigzag seam along the first seam from the inside so that the fabric does not crumble.
Sew again the top edge, where the straps begin, since the main load falls here.
Front part


Cut a small square of leather 4 x 4 cm. Fold it in half and round the corners with scissors.
Mark two parallel lines along the diagonal on the back of the fabric, and then carefully cut them through.
Place the square on the front of the backpack at an equal distance from the top and side edges and pin it with pins.
Gently sew the part in a straight seam in a circle.
Everything is ready!


Connect the halves of the straps by passing the lower short straps through the adjusters.
After doing this, fold the short straps and stitch the two parts so that they do not slip out of the regulator.
Zip up and enjoy the end result.
Now you can go on an adventure with a great new backpack!
Original article in English
Share
Pin
Tweet
Send
Share
Send


