Share
Pin
Tweet
Send
Share
Send
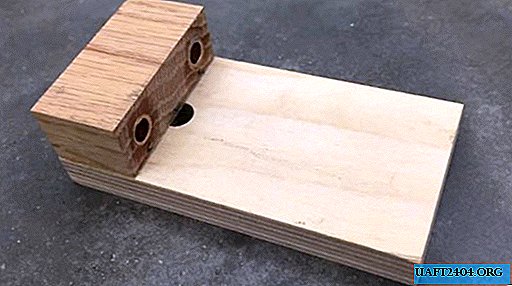
As a rule, such devices are not made disposable, and are designed for long-term use. Therefore, the whole secret lies in their exceptional accuracy, so that the verified dimensions can once and for all be able to replace the tape measure or even the caliper.
The only drawback of this, like most furniture and carpentry templates, is the complete lack of customization. That is, if you made it under the thickness of the board, say 25 mm, and the interval between the two dowels of the same connection is 30 mm in the centers, then it will be so, and nothing else. For a different size, you will need to make another template.
We will analyze the application of our template by the example of manufacturing a small frame - a sash or a frame of a furniture facade. A quick calculation shows that even when creating such a simple product, it will be necessary to install 12 dowels, which means to drill 24 exact holes. Only marking them up will take a lot of time, and with a template this will be done many times faster. Let's get started!


Materials, tools for making a template
It is reasonable to believe that such accuracy cannot be done with bare hands. We need a circular with a carriage for cutting at an angle of 90 ° and a vertical drilling machine. For workshops, this equipment is not particularly unique, because today it is quite affordable.
The material for the template is production waste. You heard right, we will do it from scraps of blanks, since the dimensions are very small. You will need carpentry glue, drills of different diameters and a good measuring tool - a ruler or vernier caliper. The general view of our template is as follows.

Making a template for dowels
The first step is to choose a blank for the working part of the template. Hardwoods are considered ideal for this: oak, acacia, beech, ash. We expose the ruler on the circular, and we cut the workpiece, the width is 5 cm. We cut the workpiece at right angles with the carriage on the same circular. Length - 2.5-3 cm.


Now you need to mark it as accurately as possible under the working holes. But if they are left unprotected, then the wood from numerous drills very quickly flares up, and the template becomes inaccurate. To avoid this, we select several segments of a metal pipe with an internal diameter of 8 mm (this is the size of a standard furniture dowel), and we make them into fit sleeves for the template.
We drill holes for them on a vertical machine. The center interval is set based on our workpieces, which we will process using the template (in our case, this is about 3 cm).


From a small piece of plywood (thickness 8-10 mm) we make a handle-holder. We cut it on a circular along the width of the working part, that is, 5 cm.
Having measured the size of the length of the working part, we put a mark in the middle of this plywood plate. We drill a through hole with a diameter of 9-10 mm. This will be a viewing technological hole. It can be slightly cored from the front.


Using a vernier caliper, mark the middle between the two holes of the working part of the template. We put a mark on its lateral edge.


Now you can connect the two parts of the template together by gluing them to the joinery or PVA glue.

It was the turn to put metal sleeves for drilling into our template. If the holes are not loosened, then they will hold well without glue. You can press them in with a manual carpenter's clamp.


Our template is ready, now you can check it in action. They need to work, pressing the clamp to the workpiece. As you can see, everything works great!


The technology for using such a device is very simple. On a flat surface, it is necessary to position the prefabricated structure so that it is possible to mark the midpoints of all the mates. This can be done by hand, without roulette. In the place of pairing the elements, identical marking of both parts to be joined is made and a short risk is placed on both workpieces.


Further, everything is as if knurled: the template through the inspection hole is centered with markings on the parts and clamped with a clamp. Holes are drilled without additional measurements. The drilling depth is adjusted by the length of the drill or by a removable limiter.


It remains all the details before the joint to be well lubricated with glue, and assemble by pressing the joints with clamps. In such a simple way, you can easily avoid differences in thickness when splicing precast workpieces, their subsequent grinding and changes in their thickness.


So many shortcomings are solved by one small simple template!
Share
Pin
Tweet
Send
Share
Send

